Last modified: 2023-10-18 20:17:49
< 2023-10-17 2023-10-19 >On to facing down the escape wheel. First I need to separate all the pins/shafts from the wheels.
Oops, I overdid it. It is now 0.43mm thick.
I am having trouble measuring the lengths of the pins, because I can't hold them and operate the digital caliper at the same time.
I was thinking I might drill some 0.5mm holes in the die block, 2mm, 2.5mm, and 3mm deep. The 2mm one will be used for hammering the parts on to the pins, and the other two will be used for gauging the length: they're at the right length when they sit flush with the top of the hole.
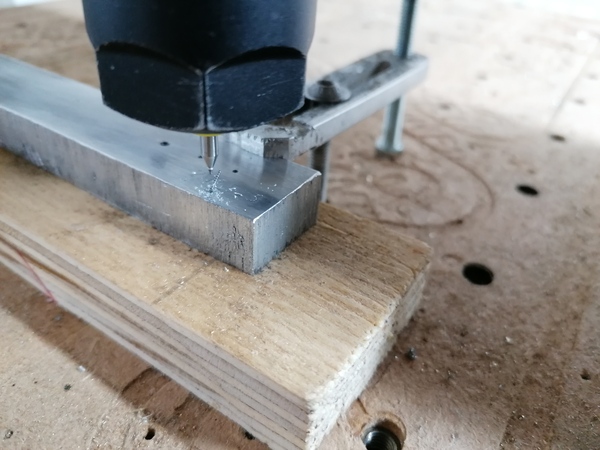
Great:
That was at 2500 rpm, feeding at 10 mm/min with no pecking, going to 2.5mm depth, with no cutting fluid.
The jesref lathe speeds table says that for drilling aluminium with HSS at 0.5mm diameter you want at least 20k rpm, although I always find it's a bit aggressive on the drilling speeds. But maybe I should be using a bit more than 2500 rpm, and doing some pecking.
https://incoherency.co.uk/jesref/lathe-speeds.html
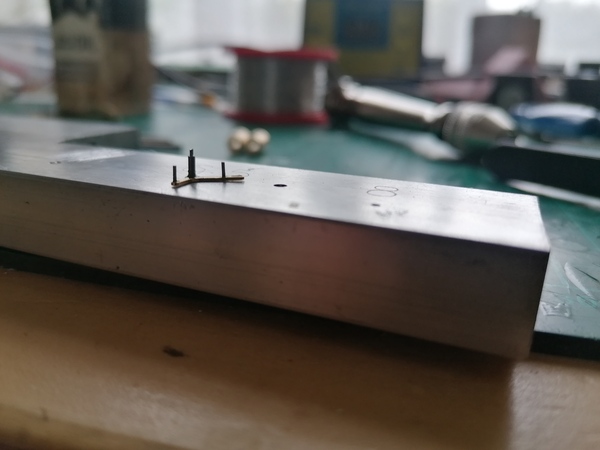
So I can't make the length gauge holes for the pins. I'll have to go back to just struggling to measure them, pending delivery of new PCB drills (should be later today).
I tried to polish all of the parts with Autosol, but I didn't have a lot of success. I tried both with and without the cloth wheel on the Parkside Dremel tool.
I did find that the Dremel tool runs a lot faster (and more smoothly) if I squeeze the housing, so I wrapped a jubilee clip around it, seems to have improved the Dremel but hasn't helped for my polishing, if anything it made it worse, I think maybe it spins too fast.
So I really need to learn the principles of polishing so that I can more reliably do a good job.
Now I'm going to clean the parts in isopropyl alcohol and try to assemble them again.
I also find it really difficult to clean the parts. I think it's dried-up bits of Autosol stuck to it, very hard to remove. Isopropyl alcohol doesn't really seem to help, I'm not sure it's any better than water. I end up having to clean every surface with a toothpick, but the toothpick gets dirty really quickly. Probably an ultrasonic cleaner would be a good idea.
If you need a machine and don't buy it, then you will ultimately find that you have paid for it and don't have it. -- Henry Ford
So maybe I should just buy an ultrasonic cleaner.
Most of the assembly went really well! I'm happy with the axial location of the escape wheel and the balance wheel, and with perpendicularity, and even the pin in the balance wheel looks nice and square. Good stuff.
Fitting the pins in the pallet fork went well, they also look nice and square.
But fitting the shaft for the pallet fork, not so good. It looked like the pallet pins were sticking out past the end of the shaft, even though the axial location was correct, so I pushed it back a bit, but this may cause other problems (e.g. rubbing on the balance wheel).
I think the issue is that the pallet fork is bent:
From CAD, the pallet pins do get pretty close to the frame plates:
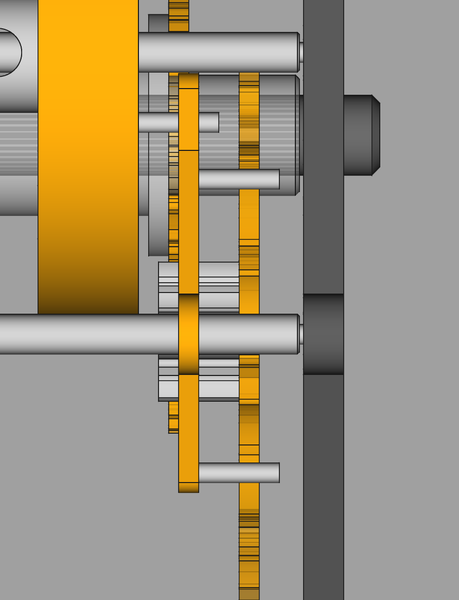
Maybe I shouldn't be designing things to run within 0.5mm of the frame plate.
I measured the pallet pins' stick-out at 2.2mm, which is 0.2mm too high, which uses up 0.2mm of our supposed clearance. And the axial position (after adjusting) is 3mm. Should be 2.5mm according to CAD, so that gets back our 0.2mm clearance, with 0.3mm extra, leaving 0.8mm clearance in theory, although the bent pallet fork loses some of that again.
There should be 1 mm clearance between the pallet fork and the balance wheel, so moving the pallet fork down by 0.5mm should not make it interfere with the balance wheel.
So I'll try to assemble it all now, and if the pallet fork won't line up, I'll try and work out how to straighten it, and maybe either shorten the pins or just tap them in further.
This looks good!

It feels like it might be getting towards working. Upon unlocking a pallet pin, the other pallet pin ends up either on the locking face, or right on the corner. So it's either already good enough, or very close. Possibly the difference is just due to the out-of-concentric escape wheel.
Some of the pivots are very tight. I have put a drop of 3-in-1 on each one, and I expect they'll free up with time, so I'm not overly worried about that just yet.
I noticed that one of the pallet pins has come loose: https://www.youtube.com/watch?v=RLNDavSXPrc
Maybe I put too much force on it? Or maybe I didn't give long enough for the Loctite to set? In any event, having a boss for the pin to sit in would help.
I changed mk-pivot to use a lower feed rate on the chamfers:
https://github.com/jes/concentric-gear-cutting/commit/bc1015e187acf54490e981ab01b8e275ce1d3b3c
In this video: https://www.youtube.com/watch?v=DV9FI_Zy1Jc he has a similar system with a large hollow wheel that needs pivots, and his solution is to put 3 pivots around the outside of it. Good idea! In my case I could put 3 pivots on the inside of the inner barrel, there is easily space for them.
It might also be good to have a (V-shaped?) ridge sticking out of the inner barrel, that locates in the pivots, to locate it axially, if not too much trouble to machine.
I was looking back over some of the notes and realised it is only 4 days ago that the metal escapement first got assembled with escape wheel, balance wheel, and pallet fork for the first time. Since then I have:
If it only takes 4 days to go from "slapped together in a way that can't possibly work" to "almost looks like it will work", that's good! In my mind it feels like it's taking weeks to make any progress, but it's really not.
Most of that time has been spent working on discovering techniques and making tooling, which both pay superlinear returns because I get to keep them forever.
mk-pivot onto the milling machine PC