
A couple of weeks ago I learnt about an interesting 3d metal printing process, from a company selling it for $100k USD, and speculated that it might be DIY-able for much less. Well I now have some promising first results.
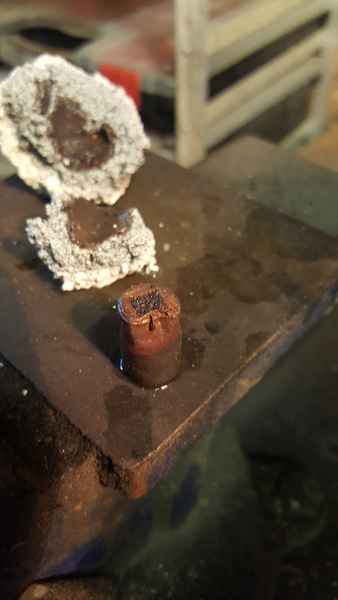
TL;DR is that the one on the right here is 3d printed using bronze-filled filament and then sintered into a solid (ish) metal part:
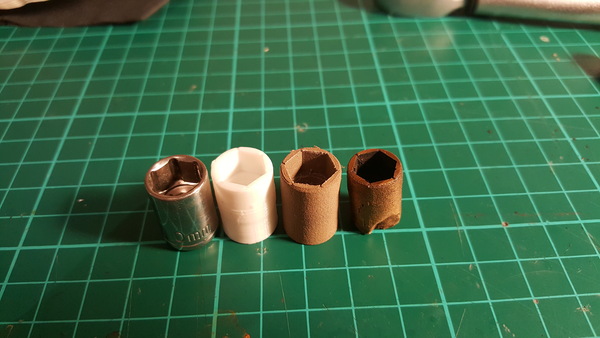
The model I'm testing with is a 10mm hex socket with 1/4-inch square drive.
Planning
After I wrote the other post on 3d metal printing, u407 on reddit directed me to The Virtual Foundry. The Virtual Foundry is an American company that sells metal-filled filaments and describes a process for sintering them into solid metal parts. In particular, they describe a process for sintering copper and bronze filaments that does not require the furnace to be under vacuum. This is good, because this is getting approachable. Interestingly, they combine the debinding and sintering into one continuous firing in the furnace, i.e. the binder is removed by burning it off in the same furnace as the remaining metal is sintered.
I watched a video from ProjectTube where he tries out The Virtual Foundry copper and bronze and tries to sinter them, with mixed success. Although, he didn't follow the instructions very closely, and it looks like the furnace he used doesn't hold its temperature very precisely anyway, so hopefully I can do better.
The Virtual Foundry's bronze filament is reportedly "around 87% metal", with a PLA binder. But it ships from the US which I don't want to wait for, so instead I bought some 80% bronze PLA from 3dfilaprint, which is much cheaper, and ships from the UK, but doesn't come with any promises about sintering.
I also contacted BASF about their Ultrafuse 316L filament. They don't really seem setup to deal with hobbyists, but they eventually sent me the "User Guidelines" for the Ultrafuse material, and I discovered that it requires a catalytic debind process. That is not something that I'm likely to be able to do. But they also said that if I 3d print some parts in their filament, I can ship them to BASF and they'll debind and sinter the parts for €40/kg (plus shipping and VAT, I assume). That might still end up being cheaper than getting stuff 3d printed in metal by Shapeways, but I'm not really interested in having third-parties make the parts for me, I want to be able to do it myself. It would be great to be able to do steel eventually, but getting bronze working is a good place to start.
Printing
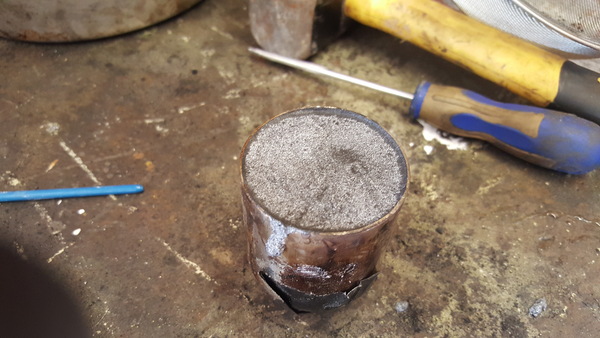
Figuring out how to print this stuff took a little work. My first attempt was to just load the filament into the printer (I'm using an Anycubic i3 Mega) and print it with the same settings I use for ordinary PLA. This didn't work. The nozzle oozed filament a lot more than it normally does, I think because the bronze filament conducts heat more readily, so there is more molten filament inside the hot end. But that's not a problem, that won't stop it printing. The reason it didn't print is that the filament was getting balled up inside the extruder and not going down the Bowden tube. I have a video demonstrating the problem.
The pieces of filament that I removed while debugging this problem looked like this:
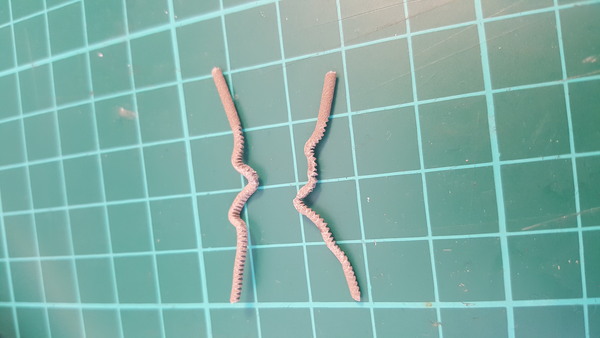
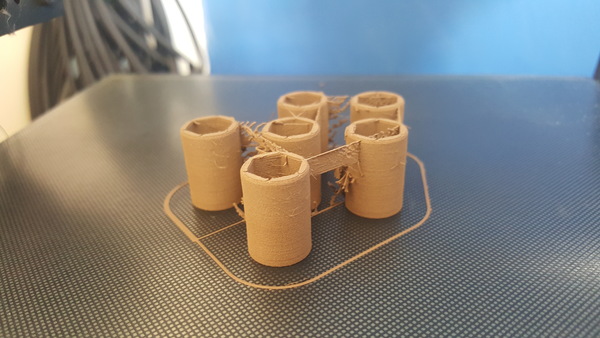
You can see that the gear on the extruder has eaten into the filament quite a lot, and they have some sharp bends in. I tried again with the speed reduced to 50% and the same thing happened. Eventually I figured out that repeated retraction was wearing out the filament, as it was run back and forth over the gear in the same spot. So I printed it again with retraction turned off, and the print completed, even with the speed raised back to 100%:
(I know it looks a different colour here, but it's just different lighting)
The stringing between the parts is a combination of the ooziness of the nozzle, and the lack of retraction. But it's not too hard to clean it up with a knife, this filament is surprisingly much softer than plain PLA is, and cuts more easily.
Sintering
The Virtual Foundry sintering process for bronze needs a furnace that can reach 865°C. I picked up this one for less than £200:
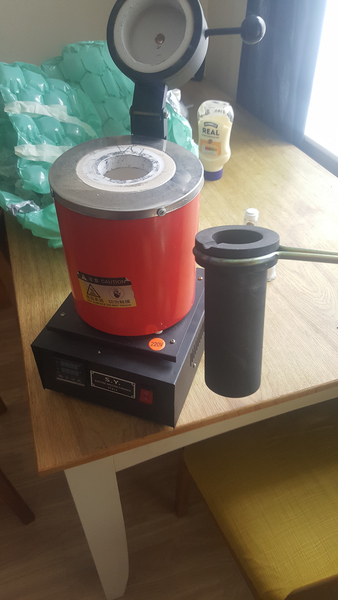
It has a PID controller to keep the temperature at whatever you set it to, with a maximum of 1150°C, and even comes with a graphite crucible, which would be useful if I ever do any casting. The main thing wrong with it is that the chamber is quite small.
The other thing required is some "magic black powder" that TVF sell for $17/kg. They don't say what is in it, but here's what we do know:
- it sets solid after mixing with water
- it is slightly porous, to allow PLA gases to escape
- despite being porous to gases, it prevents oxygen from getting in
- it turns white from the outside-in as it uses up oxygen
With that in mind, I surmised that a mixture of "fine casting plaster" and charcoal powder would do the job. Casting plaster sets solid when mixed with water, and is porous to gases, and charcoal burns when exposed to oxygen and heat, and turns white after burning, so what could go wrong? So I smashed up a bunch of charcoal, seived out the powder, and mixed it with my plaster roughly 50:50 by weight:
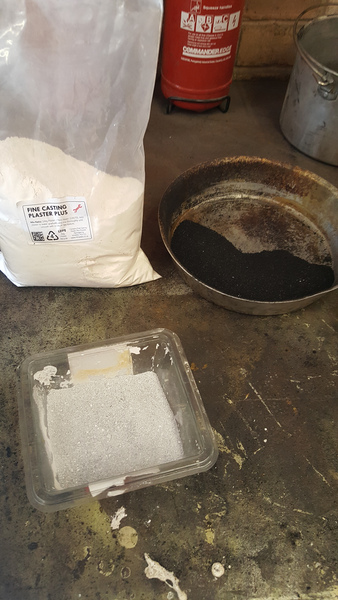
I coated my "green part" in this charcoal plaster, inside a piece of metal tube, and left it to set.
If this is indeed the makeup of the TVF Magic Black Powder, then they are using much finer charcoal powder than I managed to make, as you can clearly see the white spots and black spots, instead of a smooth grey colour.
The TVF sintering process takes almost 12 hours. But most of this is at temperatures far too low to sinter bronze, so I suspect it is mostly dedicated to boiling/burning off the PLA and driving the remaining moisture out of the plaster, so it's plausible that you could stop partway through and then resume another day, but for my first attempt I wanted to follow their instructions as closely as possible.
Yesterday I had 12 uninterrupted hours in which to supervise the furnace, so yesterday I did my sintering. I kept quite a detailed log of the temperatures:
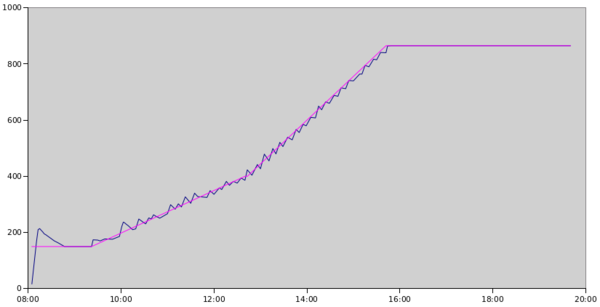
(Sorry there are no axis labels. X-axis is time of day, Y-axis is °C, pink line is desired temperature, blue line is actual temperature)
Ideally I would use a programmable furnace, but my furnace only supports setting a constant target temperature. My solution to "ramping" the temperature at a consistent rate was to manually increase the target temperature every ~10 minutes. The PID controller on my furnace does an excellent job at maintaining a constant temperature, but it seems to overshoot the target every time you set a new one. But apart from that, I got the temperature profile almost perfect.
Once the heating was done, I took the chunk of plaster out of the furnace with a pair of pliers and dunked it in a bucket of water. Surprisingly, it floated at first, and also it burst into flames after I put it in the water. I guess there was lots of trapped gas inside the plaster, and I guess the flames were actually caused by exposure to oxygen in the air, not exposure to water.
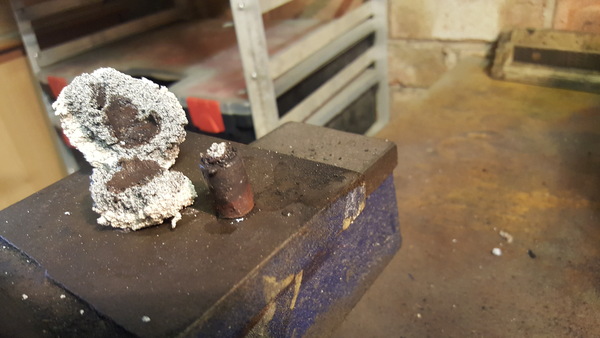
After it cooled down a bit, I fished out some of the chunks of plaster to see what was inside.

You can clearly see where the outer pieces of charcoal plaster have burned up and turned white, and the inner pieces have not had exposure to oxygen and are still grey. So it looks like the charcoal plaster, at least, was a success. At this point I thought that was all that was successful, and that the bronze PLA stuff had all just disintegrated, but swilling the bucket of water around a bit more I was amazed to find this!
That's a sintered bronze part! Unbelievable. I didn't actually expect it to work, not on the first try. It even feels like it's bonded together pretty well, like an actual metal part. I squeezed it quite hard to see if it would crumble apart into powder, and it didn't crumble but it did deform:
So that tells us that the metal is actually sintered together (else it would just crumble), which is a great result, but for some reason it isn't very strong. I cleaned more of the charcoal plaster remnants off, and sanded the end to see what it looked like:
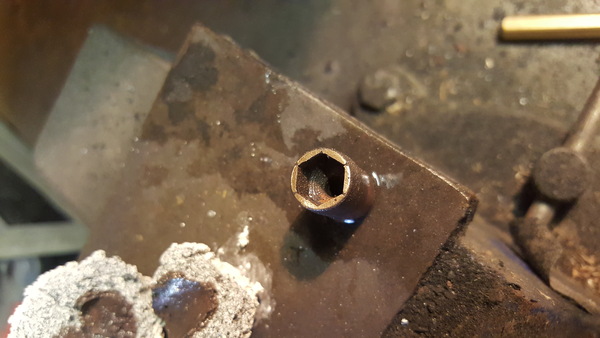
That looks great! That's exactly what I'd expect a metal part to look like. I wire-brushed the outside to clean it up a bit, and noticed that the end with the square drive has some big holes in it:

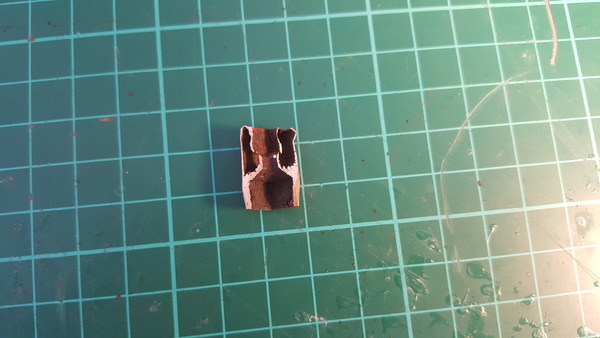
So it looks like it's hollow at one end, which is why it deformed when I squeezed it. Indeed, cutting it in half reveals the extent of the hollowness:
The bronze initially looks like brass after sanding or wire-brushing, but over the course of a few minutes it turns a more coppery colour as (presumably) oxides form on the surface.
Some thoughts
The filament is 80% bronze by mass, and the density of bronze is about 6x the density of PLA, so that means the filament is actually only 40% bronze by volume. This is why the part is hollow at the top: there is just not enough material in here to fill the space. I think the material all sinks to the bottom of the void in the plaster as the PLA starts to boil off, leaving only a thin layer of bronze powder stuck to the sides.
I checked the resistance of the part with a multimeter, and it seems to have negligible resistance. I measured 0.6 Ohms from one end of the part to the other, and also 0.6 Ohms when connecting my multimeter leads directly to each other.
During sintering, the distance across the flats of the hexagon shrunk from 10.2mm to about 9.3mm (~9% shrinkage, x/y plane). The outside diameter of the socket shrunk from 13.9mm to 12.8mm (~8% shrinkage, x/y plane), and the height of it shrunk from 20.2 to 19.0mm (~6% shrinkage, perpendicular to x/y plane).
I wanted to connect the socket to a torque wrench to see how much torque it could handle without breaking, but the shrinkage meant I couldn't actually fit it on either the 10mm bolt head or the 1/4-inch square drive.
Less than 10mm of the charcoal plaster was "used up" by oxygen in the furnace, so I think for the temperature profile that I used here, a 10mm coating of charcoal plaster would be sufficient. For a much larger part, you would probably need to heat it for longer, and therefore you'd need more charcoal. I suspect the distance you need around the outside scales linearly with the amount of time it's heated. Also, if you want to switch the furnace off partway through and then resume another day, you'll probably need extra thickness as some extra charcoal will be used while the furnace cools and then heats up again.
Next attempt
For next time, I'm going to stretch the part by 9% in the X/Y plane, and 6% in the Z axis, to account for shrinkage and hopefully get a sintered part that I can actually fit on a bolt and a torque wrench.
If the part has shrunk by 9% in the X and Y directions, and 6% in the Z direction, then the total volume is reduced to 0.91*0.91*0.94 = 78% of the original volume. But only 40% of the original volume was bronze, so if we want the entire part to be full of bronze and not hollow at the top, then we need to add an entire extra part's worth of extra material at the top, so that when it all sinks to the bottom, there is enough material at the bottom to fill the part solid. Since I already have a handful of 10mm sockets printed in bronze PLA, I might just stick one of those on top to use as sacrificial material.
Also, it would be good if the furnace would follow the temperature profile automatically. There is a good YouTube video by VegOilGuy about converting a PID furnace to be controlled by a "CAL 9500P" process controller which supports programmable temperature profiles. A new CAL 9500P is more than £200, but I found a secondhand one on eBay for only £20, so I have bought it and hopefully I'll be able to make it control my furnace. I would then be able to leave the furnace on overnight, unsupervised, and get up in the morning just in time to quench the part at the end. That is, depending on how confident I am that the furnace is safe to leave unsupervised at 865°C.
Sintering vs casting
This process is very much like "lost PLA" casting. In lost PLA casting, you print your part in PLA, embed it in plaster, get it hot for a long time to burn off all the PLA, and then fill the void with molten metal.
In our sintering process, you print your part in PLA that already has metal in, embed it in plaster, get it hot for a long time to burn off all the PLA, and then keep it hot for a while so that the metal particles stick together. It's not really all that different to casting. The advantage of sintering is that you don't have to pour any molten metal, which also means you don't have to deal with scraping the slag off, the part warping as it cools non-uniformly, or designing feeders and sprues, etc. The disadvantage of sintering is that it requires the metal to be in filament form, and it is less forgiving of oxygen contact and incorrect temperatures, and fewer people have attempted to DIY it so there is less information available.
The big advantage of the sintering process that Markforged, BASF, etc. are doing is that you can make parts with hollow infill. Unfortunately, our process goes through an intermediate stage where the binder turns to a liquid in the furnace, whereby it flows downhill, and carries the metal powder with it. If we had hollow infill, the infill material would all sink to the bottom, so we can only sinter parts that are completely solid, like those that would be produced by casting.
I don't actually understand how Markforged and BASF can print with a material that obviously becomes runny at about 250°C, and yet retains its shape while in the sintering furnace at 1300°C. It would be good to learn more about how this works.
Help still wanted
I'm still interested in hearing ideas for improvements to this process. Particular problems that want solving include:
- how can we prevent the part from becoming runny in the furnace? (e.g. for hollow infill)
- is there a temperature profile that would do the debinding and sintering in substantially less time?
- is the "catalytic debind" of the BASF filament DIY-able?
- what's the cheapest way to acquire a vacuum furnace suitable for sintering stainless steel?
If you've done any sintering, I'm interested in hearing about it. And if you reproduce the steps described in this post, I'm also interested in hearing about how that goes.