
Overnight I did my first test of a homemade keyboard switch on the automatic tester. The spring in the switch broke after 13907 presses. That makes Martin our competition winner, with a guess of 10000.
I went to bed last night to the faint sound of the tester clicking the switch at about 1 Hz, but when I woke up this morning I was disappointed to find that the sound had stopped! With the spring broken, the switch failed closed, which meant the tester never reached a state where it was ready to do another cycle so it just sat there doing nothing.
Switch
This is the best picture I have of the switch:
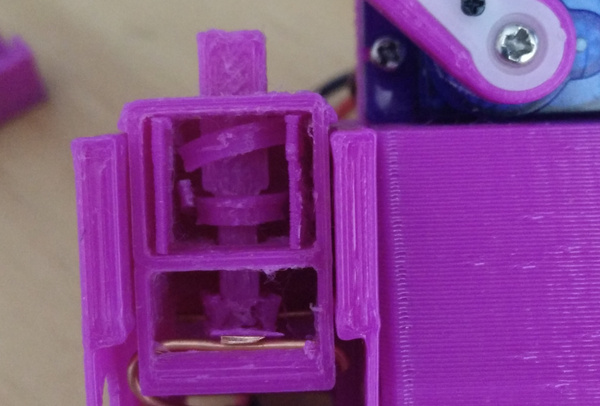
It's mounted in the tester, and you may notice the photograph was taken after the spring had already failed.
This is the CAD model, but it doesn't explain much because it doesn't show how the coil spring stretches out:
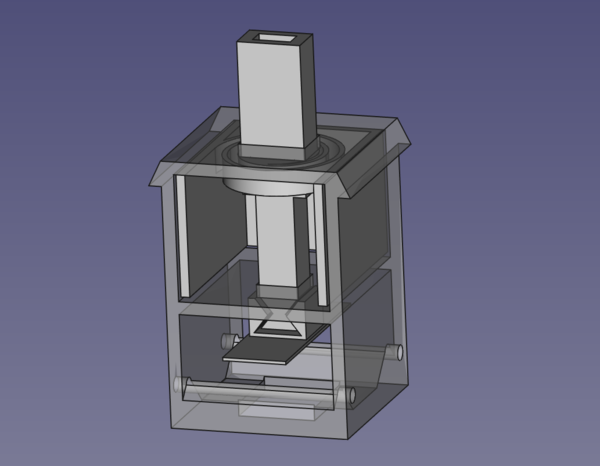
It has a footprint of 14mm by 14mm, which is the same as a Cherry MX switch, although currently it can not be pressed straight down into a 14mm square hole because the wires stick out the sides. Also it is about twice as tall as a Cherry MX switch.
The switch is made of four 3D-printed parts (case, plunger, coil spring, flexible flat plate), 2 copper wires to provide contacts at the bottom, and some adhesive copper tape on the flexible flat plate to connect the copper wires together when the plunger is pressed down.
When you press down on the plunger, you are stretching out the coil spring at the top. Once you press far enough for the flexible flat plate to contact both of the wires, electricity can flow and the switch is "on". If you want, you can keep pressing all the way to the bottom of the 4mm stroke, stretching out the coil spring and bending up the flexible plate. Cherry MX switches (all?) have a 4mm stroke, with activation at the halfway point, which is what I'm trying to mimic here.
In the actual switch (but not shown in the CAD model), the coil spring is held away from its resting position to provide some pre-load: if the coil spring were allowed to return to its flat form, then the initial force required to move the plunger down would be 0, which would make for an unusual typing experience. By forcing the spring to be pulling up on the plunger, we create some initial force that must be overcome before the switch starts to move.
I got both the idea of using a flat coil spring and the idea of using adhesive copper tape from Riskable 3D Printing on YouTube.
The spring eventually failed when the coil spring broke in half. I had actually expected that if anything broke it would be the flat flexible plate because it is so thin. I think that because the servo backs off as soon as it makes contact, there is never much force on the plate. If the servo bottomed out the key instead of letting go, maybe it would be different.
Test
I have a short clip of the tester with the homemade switch in case you want to see what the test setup looked like.
Obviously this is only a sample of 1, so we should be careful about stating any conclusions too strongly, but it's at least more data than I had before.
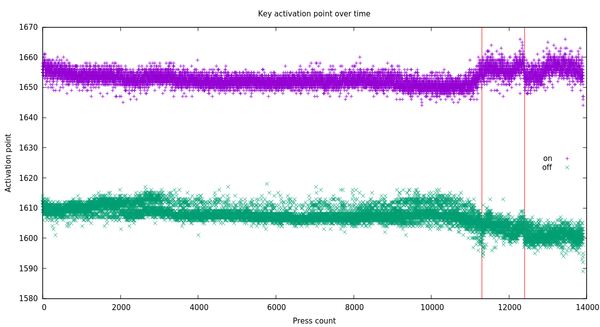
The activation points were relatively consistent for the first ~11300 presses (apart from a surprising bimodal distribution of the release point for part of the test?), until something changed around the position of the first red line, when the servo had to start pressing the finger a bit further before the switch would come on. Then around the second red line at ~12400 presses, the activation position dropped off quite quickly, over the course of only a few tens of presses. I expect both of these points correspond to some part of the spring starting to yield. It might have been interesting to leave a camera filming the tester so that we can see exactly what it looks like at each press.
Finally, over the last 5 or 6 presses, the activation position dropped off precipitously, followed by the switch ceasing to function. This is when the spring finally gave way completely.
Nearly 14k presses sounds OK until you consider that, if 1 in 5 keystrokes is a space, and you type at 120wpm, then you can expect to press the spacebar 120 times a minute. That means you'd reach 13907 presses of the space bar in just under 2 hours of 120wpm typing. Not very good.
Just looking at the characters that are stored in my blog posts, I would have worn out my spacebar over 10 times, and would be on at least my third switch for each of e,t,o,a,i,n,s,r,h,l. Not to mention backspace! So the switch definitely needs to work better before I make a keyboard.
Notable entries in the competition to guess how many presses it would take to break the switch included a 17 (???) that was subsequently revised up to 900, a 5000 that was revised down to 200, "tester fails before switch", and "jes gets impatient and redesigns the tester or the switch before either one fails".
Tester
The tester presses the switch far too gently. It lets go as soon as it detects that the switch has made contact, whereas a human typist is likely to smash the button all the way to the bottom of the stroke. Once I've made a switch that can withstand a sensible number of gentle presses, I think I'll want to make the tester press it all the way to the bottom without letting go, to get a more reliable test.
Feroz said the tester "types like his Mum".
Stavros said the Tower Pro SG90 Micro Servos are not very accurate, and indeed it seems that way. From the graph above, the random variation in activation positions is about 10 microseconds of PWM pulse. There are 1000 microseconds in 180° of rotation, so 10 us is equivalent to 1.8°. The contact point of the finger is 20mm from the centre of rotation, so a variation of 10 us in PWM signal is equivalent to a variation of 20 * sin(1.8°) = 0.6mm. So that's not very repeatable at all!