Last modified: 2023-09-17 20:17:37
< 2023-09-16 2023-09-18 >At night I was imagining how the case would be made, and worked out that it's not actually obvious how the face will be attached. If the bezel is attached to the outer barrel, and the hand is attached to the inner barrel, what can the face be attached to?
So I think it can't actually be wound by the "bezel", the bezel needs to be fixed to provide something to hold the face.
Also, it's still not actually clear what the bearing surfaces for the barrel parts will be. Will need to figure this out otherwise it will end up sloppy and will wear out quickly, or not even work.
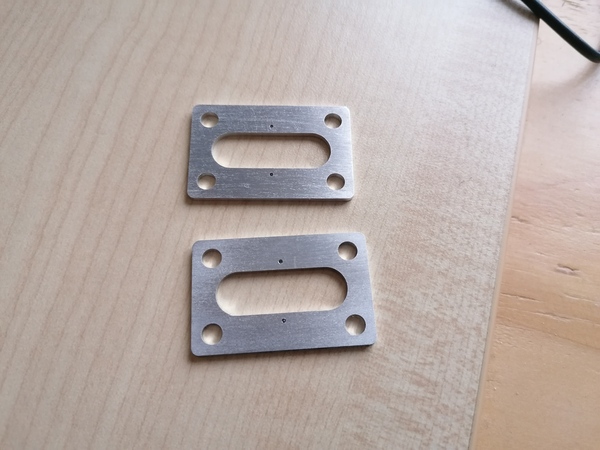
On to making the frame pieces...
I used WD-40 as flood coolant this time, and the 2mm 1-flute end mill. They're made out of 2mm sheet.
First part: 7m19s, 330 mm/min.
Second part: 6m12s, 400 mm/min (+20%)
It didn't seem any more unhappy at 400 mm/min than 300, so I've updated micromachining.md to say 400 instead of 330.
I weighed the WD-40 bottle before and after the second part, it reduced from 531.1g to 508.9g, which means I used 22.2g. I bought 5 litres for £35, assuming 1 litre = 1kg (it's actually less than 1 kg/litre, which means this is an under-estimate of the cost), I used about 15p of WD-40. Not a problem for now but it could add up if I make a lot of copies of something.
2mm sheets of aluminium can be had on eBay for £75/sqm (probably for much less if you look harder). My frame plates use up about 0.002 square metres, so I also used about 15p of material. Spraying the WD-40 has doubled the consumables cost! Although, for that matter, I probably spend more on broken tooling than on either materials or WD-40.
I'm using straight pivot holes for now because I don't have a tapered reamer. I'm also not burnishing the pivot holes yet (does that work in aluminium?)
I couldn't be bothered trying to make 4 identical pillars on the lathe, so I tried this instead:
Looks like it might be asking a bit much though. If it doesn't work I could retry with a finer quality mode, or maybe sacrifice the locating feature and settle for vertical cylinders. Or just make them on the lathe like I should have done.
Update: it didn't work. The bore is too small, the locating feature is too big. I'm going to try vertical cylinders.
I made some vertical cylinders but I only had 2 screws long enough:
https://www.youtube.com/watch?v=ndS-ELGlqVc
With 1 nut it just barely runs, ranges from 6.8 to 7.8 Hz.
With 2 nuts, from 9.6 to 9.8 Hz.
With 3 nuts, from 11.1 to 11.2 Hz.
The tick rate is way too fast, so I need to add weight to the balance wheel. I also definitely want to add a hairspring.
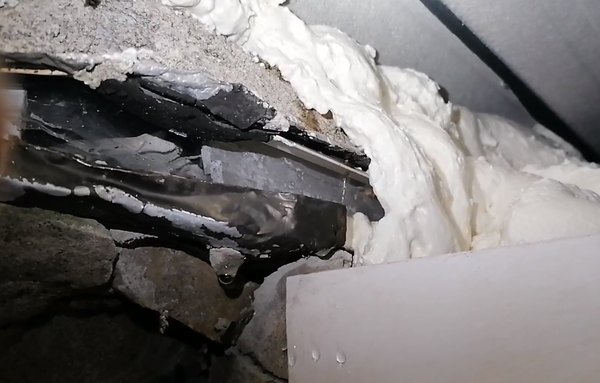
We've had our first decent rain since I finished the roof. Nothing coming in through the roof or around the edges, but there is a very tiny drip coming from the gutter where I siliconed it. I'm not quite sure how it is getting in. I won't be able to easily undo the gutter to re-silicone it so I think the plan is to wait for it to dry, put some silicone on a paper towel, and reach in and smear it around the join using the paper towel.
Update: it's coming in where I've sealed against the funny wall. Need to get up there and do some more silicone probably.
Next things to work on:
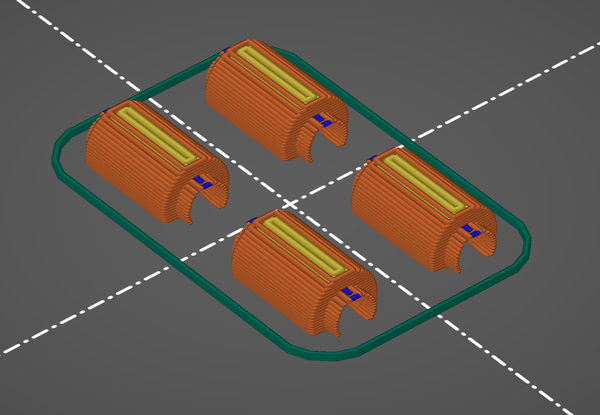
I modelled this in FreeCAD:

To allow the teeth to escape, the lever swings +/- 6 degrees, which makes the balance wheel swing +/- 19 degrees.
At maximum amplitude (i.e. when the pin on the balance wheel hits the end of the slot on the lever), the balance wheel swings +/- 36 degrees, which makes the lever swing +/- 10 degrees. This does not cause the pallet pins to crash into the root of the escape tooth, which is good.
Just need to design some frame parts, and then print it. In fact I'll set the lever and the balance wheel printing overnight.
< 2023-09-16 2023-09-18 >