Last modified: 2024-04-03 19:41:28
< 2024-03-12 2024-03-21 >Key things I need to measure:
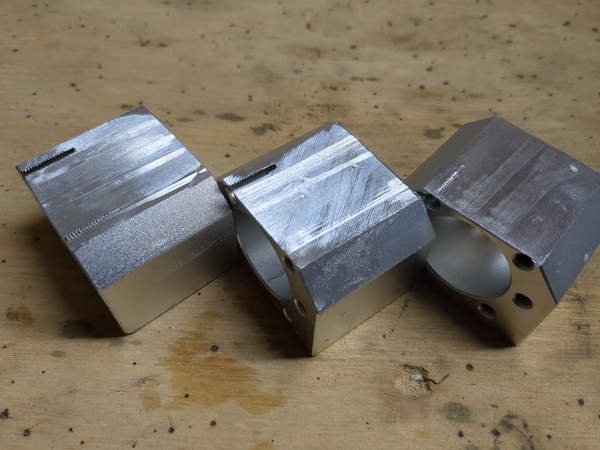
So that seems workable. And then the ballnut holders need cutting down so that they are less than 39mm tall. I won't be using the top 2 holes on the ballnut holder, so it doesn't matter if I damage them. Even if I wanted to use them, there wouldn't be room for the heads of the fasteners. So I think tablesaw off about 3mm and leave it at that? Then see that the ballnut can be attached without protruding, and grind the ballnut down if necessary.
Well it very quickly became obvious that I couldn't control the cut on the tablesaw. Perhaps I should have clamped the parts to the sled? But I reverted to the bandsaw and that did an acceptable job, albeit slowly.
Great success:
They are now 36mm tall, which should give 3mm clearance.
The ballnut flanges do protrude quite badly so they need cutting down. One has already been cut down by the previous owner, so just 2 to do.
I decided to cut the ballnut flanges without removing them from the ballscrews, with the result that I got grinding dust all over the screws. Must clean them thoroughly before assembling the machine.
All 3 ballnuts now fitting in holders, with clearance:
The shortest ballscrew is a bit crunchy, the seal is detached from the ballnut, and there seems to be small metal chips coming out of the ballnut. So that one may need looking at. I think ideally I would fully disassemble them all, and thoroughly clean and relubricate, and maybe replace those shit seals with some 3d-printed TPU ones. In fact I can do that today. Just need to be careful not to lose the balls.
And while I'm at it I can shorten the ballscrews on the lathe.
From the first ballnut I counted 50 balls as I dropped them into the acetone. I think they run in 3 separate groups, so this number should be divisible by 3, which suggests at least 1 has been lost. This will become the Z axis ballnut.
Putting the new end on the ballscrew was easy:
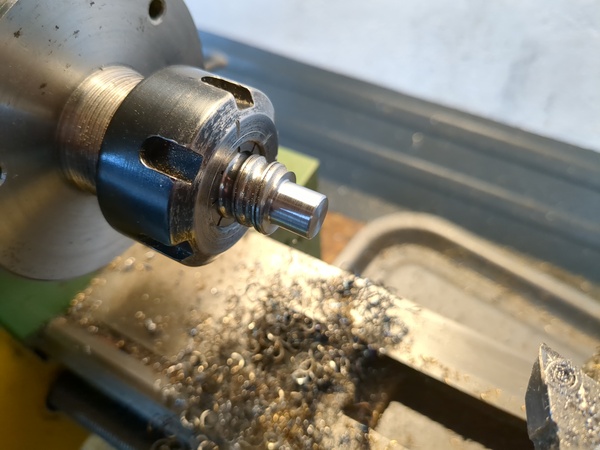
I think it might be slightly case-hardened, but it turned nicely enough with the DCGT insert. I didn't use a "spider" for the shortest one, but I may have to for the longer ones. I'll spin them up and see if they start whipping at all. The collet held it well and did not mark the surface.
The threaded length ended up slightly over-sized, but I probably don't care because I don't plan to have to use the loose end. But if I do end up putting a bearing on that end then I'll want a good 10mm of adjustment in it so that I can accommodate both this ballscrew and an off-the-shelf one of the correct length.
What sort of grease am I meant to use for reassembling these? Apparently any "general purpose lithium grease". https://www.cnczone.com/forums/linear-and-rotary-motion/78086-ballscrew-grease-lube-oil-yeah-seriously.html
Will try to get some on Amazon. In the mean time I'll disassemble, clean, and shorten the other 2, taking care not to mix up the parts.
In the second ballnut I counted 51 balls. This is for the second-longest ballscrew, which will be the Y axis.
I think this second ballscrew might be hardened, it is throwing off sparks. The sparks are very strange, they keep burning for a long time. I think they're actually red-hot chips rather than "sparks" as such. The work piece is not getting warm, so I think almost all of the heat is going into the chips.
I've reduced the spindle speed to about 1000rpm and the sparking has stopped but now the work piece is getting warm. I think I prefer this though.
I think this is definitely case-hardened, because I reached a depth where the metal had 2 different hardnesses, 1mm or so below the surface, where you can very easily see the pattern of the thread. So the troughs of the thread have hardness deeper than the peaks.
In the third ballnut I counted only 43 balls. I wonder if I should try to add some more? Or perhaps this one only had 45 to start with instead of 51? Seems unlikely.
I didn't need a spider even for the longest ballscrew. The insert was chipped after the second ballscrew, which can't have helped with the sparking.
3 ballscrews cut to the required length, and ballnut parts cleaned:
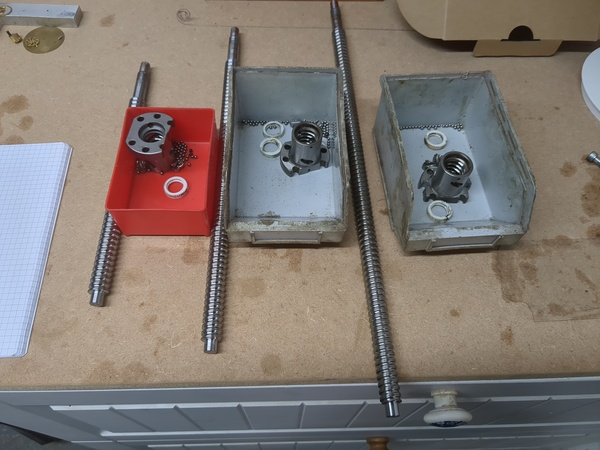
I have got some grease coming from Amazon, so I expect I'll be able to reassemble on Thursday. Next up is making some TPU seals.
Tidy:
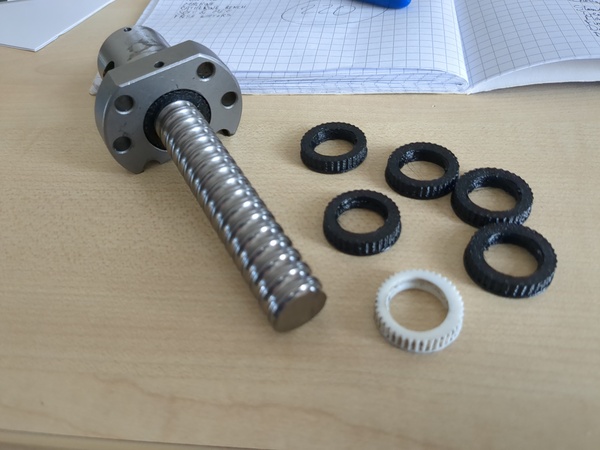
Printed from ~/cad/micro-milling-machine/1605-ballnut-seal.stl, with "Generic FLEX" setting, but temperature
turned down to 220 deg. C from 240.