
The PiKon telescope is a brilliant design for a cheap but powerful telescope using 3d printed parts and a Raspberry Pi. It is a Newtonian reflector telescope, designed to be mounted and aimed with an ordinary camera tripod, and then the Raspberry Pi camera is used to capture images. It uses a relatively inexpensive concave "spherical" mirror for the primary mirror, and has no secondary mirror: the Pi camera is small enough that it is simply mounted in the centre of the tube and captures light where the secondary mirror would normally be placed.
The PiKon was designed by a chap named Mark Wrigley, and there's an excellent talk on his YouTube channel, in which his enthusiasm for the project is clear, explaining the idea and the motivations.
So obviously I want to build one of these, and I want to improve on it. The field-of-view of the telescope is about 0.25 degrees. Due to the rotation of the Earth, this means objects far away from the North star "move" in the frame quite fast, which means you need to constantly realign the telescope. I intend to build a robotic base that will automatically track a given point in the sky. Patrick Aalto has a fascinating blog in which he documents a similar project.
What I haven't seen anyone do with a PiKon telescope is imaging deep space objects like galaxies and nebulae. I don't actually know if this will even work. It's possible that the Pi camera is too noisy to collect enough light to make them out no matter how long your exposure is, but I want to try. Since these objects aren't visible to the naked eye, having the telescope aimed by a computer is essential. Patrick used Stellarium to aim his telescope. Stellarium is a program which gives you a zoomable view of the night sky, as it would actually look from your location, and can send co-ordinates to telescope control software to make the telescope point at any location you choose. I intend to use this.
It would be cool to build an equatorial mount. This is a type of mount in which one of the axes is permanently aimed towards the North star, and thus tracking any object in the sky is as simple as rotating around this axis at the same speed, and in the opposite direction, as the Earth's rotation. Much simpler is an altazimuth mount, which just rotates in 2 perpendicular axes, so I'm going to start with that. I've bought some Chinese DC motors with builtin gearbox and encoder. The output shaft rotates at 6rpm and I was hoping this would give fine enough control that I could just directly connect the motor to the mounting system and aim the telescope without any extra gearing. As far as I've been able to work out, the encoder gives 4096 pulses per rotation of the output shaft, which means we can aim it in 360/4096 = 0.08 degree increments. That is less than the field-of-view so it would allow us to pick any object in the sky, but it is not a lot less than the field-of-view, which means it wouldn't be able to track objects smoothly, so I'm going to have to gear this down a bit further.
The other part of imaging deep space objects is having good control over the camera. Mark suggests operating the PiKon telescope by using raspistill on the command line. Raspistill can draw a preview to the framebuffer device, and when you're happy with the shot you can close the preview and run raspistill with different arguments to save a photograph to a file. This is fine for taking pictures of the moon, but for more distant objects for which we're collecting less light, we need finer control.
I found Silvan Melchior's RPi Cam Web Interface software and have played around with it a little. It seems to do pretty much exactly what I want, it just needs to be augmented with controls for the motorised mounting system. It is a web interface to the raspimjpeg program, which can provide live previews while simultaneously recording video or taking photos, and it can update the camera parameters without having to exit and reinitialise (like you would have to do with raspistill), which saves a lot of time. This particularly saves time when taking long exposures, because from what I read in this forum thread the Pi camera synchronises all of its setup around the exposure time. If the exposure time is 3 seconds, it takes about 3x 3 seconds to initialise the camera, which is very annoying. Raspimjpeg keeps the camera running constantly so can just change settings whenever the next exposure starts without wasting any time. Raspimjpeg does seem to lack raspistill's workaround to get maximum exposure time up from 3 seconds to 6 seconds, but that's tolerable, especially with exposure stacking.
Exposure stacking is where you can approximate a 30-second exposure by taking 10x 3-second exposures and adding the resultant images together. This has a key advantage over long exposures in that a.) if the object has moved slightly in the sky, you have a chance to realign it after-the-fact, and b.) you can take images with longer exposures than the camera supports. The downside of exposure stacking is that it amplifies noise as well as signal. I watched a tour of the Isaac Newton Telescope in which the operator took some photographs of the sky at dusk, before the night's work began, called a "sky flat". He can then use the sky flat to calibrate what the signal from the sensor looks like on a plain background, and use that to remove noise from the real photographs. Another approach is to cover the end of the telescope so that no light is getting inside, to find out what the noise floor of the sensor looks like absent any stimulation from light. I intend to experiment with both of these.
I have actually already built the telescope itself, and tested it out for the first time today. Here's a photograph of it:
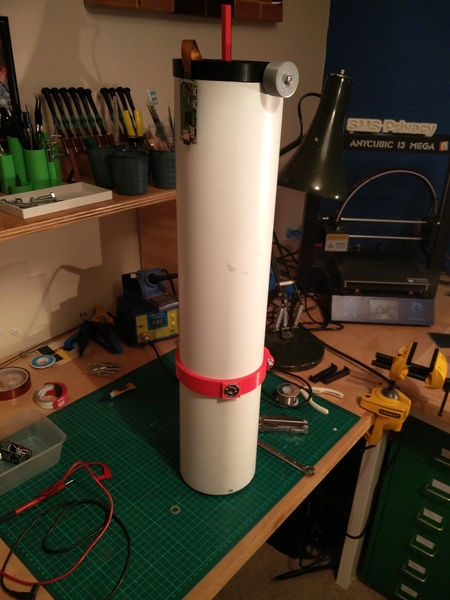
It uses 3 different colours of 3d-printed plastic because I happened to reach the end of first a grey and then a black spool of filament. Still seems to be plenty of life left in the red/pink, unfortunately. The clamp around the middle of the tube is for attaching it to the altazimuth mount that I have not yet built (the clamp is roughly at the centre of mass of the telescope - the mirror is substantially heavier than the camera and Raspberry Pi!). The circuit board on the side at the top is a Raspberry Pi Zero W. The ribbon cable goes down the "mouth" of the telescope and connects to the camera, which is mounted on the other end of the red stick, and can be moved in and out to focus the image using the grey knob. The bottom end of the telescope houses the concave mirror.
I managed to take this awful picture of part of the moon by pointing the telescope out of my bedroom window:
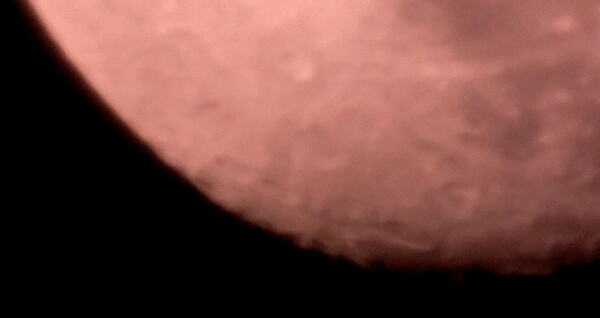
Since I don't yet have any kind of tripod or computer control, I have to aim it manually and try to hold it still. It is actually quite hard to even get the moon in the frame when you're only looking at a quarter of a degree of the sky. You'll also note that it is not quite in focus. Once the telescope is focused it should almost never need re-focusing, as looking at things in space basically just wants it to be focused infinitely far away. However, I found that the focus knob on the PiKon is extremely sensitive, so I would rather not have to set this up manually. Fine-tuning the focus electronically certainly sounds easier. Patrick used a servo to drive a gear so that he could adjust this in software. I intend to do something similar. It doesn't need to be able to move the focus knob through the entire range of its motion, as only a very small range is actually useful. The rest of it could better be described as "calibration" than focus, i.e. it has lots of range in order to take up variations in the tube length and mirror focal length.
My house is not a very good place to do astronomy as there is a lot of light pollution, buildings, and trees in the immediate vicinity. My aim is to take the telescope to some remote-ish location, set it up outside, and control it from a laptop inside my van. Since it would likely be at a different place each time (even if only slightly different), the altazimuth tracking will need recalibrating each time. Probably the easiest way to do this is to aim it vaguely at the moon by eye, then jog the axes until it is pointing at the centre of the moon, and then sync that to the coordinates that Stellarium says the centre of the moon should be at. Afterwards, aiming it anywhere in the sky should line up correctly.
I've never electronically controlled a motor before, but I have an L298N "dual H-bridge motor controller" and it was surprisingly easy to use. You just give it a power supply to send to the motor, and then you have 2 pins for each motor: set 1 pin high and it runs forwards, set the other pin high and it runs backwards, turn them both off and it stops. I haven't actually checked what happens if you set them both high, doesn't seem advisable though. The built-in encoder on the gear motor uses a magnet and 2 hall effect sensors as a "quadrature encoder" so that you can find out the direction and relative angle of the shaft. Once you've decided where you want the telescope to point, you just have to work out how many steps of the quadrature encoder you need to pass through, and in which direction. I'm thinking I might use an Arduino to control the 2 motors and the focus servo, and just have the Raspberry Pi send commands to the Arduino to tell it where to move. The reason is that the Arduino only runs a single program, so you can guarantee that it won't be pre-empted by something else, causing it to miss some steps on the motor which would leave the telescope pointing in the wrong place.