
I recently picked up an unfinished CNC milling machine project on eBay. All the mechanical work is done, and almost all of the electronics is supplied, it's mostly just wiring and software still to do, which for me are the easiest parts.
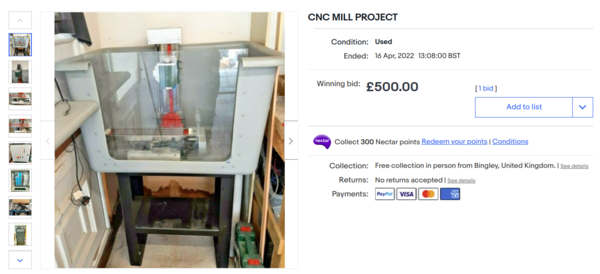
It's a "mini mill". I don't know what company in China actually makes these, but they're a small manual milling machine sold under various brand names. They look like this:

The man I bought it from claims to have spent £1000 on just the machine. There are 6 motors and drivers (3 axes, plus 2 rotary axes not yet built, plus a spare), which come to £600 on AliExpress just by themselves, and the purchase also included the pictured hotel-laundry-basket enclosure, a very sturdy (and heavy) welded steel stand, a PC, a touchscreen for the PC, and other assorted stuff that all adds up (2x DC power supplies, parallel port breakout board, electrical cabinet, ER32 collet set, ballscrews, belts, pulleys). Not to mention the time and materials that went into making all the parts for mounting the motors. I think £500 for the lot is a steal!
However I did have to drive to Bingley to collect it, which is a 10-hour round trip, so you can add on another £100 just in fuel.
I've been spending a lot of time working on Meshmill recently so haven't done much with the milling machine project, but today I got all 3 axes moving for the first time.
LinuxCNC
The previous owner had set the control box up with a parallel port break-out board, and supplied a suitable PC for Mach 3 to control it over a parallel port. I'm not interested in Mach 3 because I like freedom, so I thought the easy route would be to use LinuxCNC to drive the parallel port, rather than install Grbl on an Arduino like on my router.
So far I have had quite a lot of trouble with LinuxCNC, to the point that I am surprised anyone bothers with it. It is a lot more complicated than Grbl, for almost no benefit. I grant that some of the complication makes it more flexible, like the hardware abstraction layer, and all the different options for GUIs, and the ability to swap in different kinematics modules for different types of machine.
But a lot of the complexity is a result of trying to use PCs to do real-time electronics. For example, you have to make sure the parallel port is set to the correct mode in the BIOS configuration, otherwise it only works in one direction. You need to run a latency test to find out how much jitter can be expected from process scheduling so that you can set the main loop frequency correctly. The main loop frequency sets your maximum step rate, which is shockingly low compared to Grbl on an Arduino.
And it turns out that there is some problem with the GPU in the PC that I am using, so I have had to disable the glx kernel module otherwise the computer locks up every few minutes. It also turns out that most of the LinuxCNC GUIs require OpenGL, so most of them don't work. I'm using Qtaxis currently, which works fine but is strictly less convenient than UGS Platform, which is what I use with Grbl (most notably, jogging the axes takes more clicks, and manually setting the current position requires typing G92 commands at the console instead of editing the number in the DRO). I'll probably make my own Qtvcp GUI if I don't come up with something better.
But for now I'm persisting with LinuxCNC. Maybe I'll see the light eventually.
Servo drives
Rather than traditional stepper motors, this machine came with Leadshine "hybrid servo motors". They are controlled just like stepper motors (you give step & direction signals to the driver), but I gather that the motor internally works like some sort of cross between a true servo motor and a stepper motor with an encoder on it. I don't completely understand how it differs from a true servo motor, but they're variously called "hybrid servos" and "easy servos" rather than just "servos" so I'm guessing there is some important difference.
When you crash a machine with normal stepper motors, the driver has no way to know, so the motor loses steps and the job carries on and the work piece gets destroyed and there is no way for the control software to do anything about it.
With these Leadshine motors, the driver continuously monitors the position of the motor and if it differs from the commanded input, it tries to correct it. If it is unsuccessful, and the following error gets too large, then the driver cuts power to the motor and goes into an alarm state. There is an alarm output from the driver which can be connected to the control software so that you can know something bad has happened, stop moving the other axes, and maybe not cause as much damage.
So far so good.
But once the driver has got into the alarm state, I'm not actually sure if there is any way to get it out of the alarm state short of switching it off and on again. I tried toggling the enable pin but it seems to do nothing once the alarm state is active. I could add a relay to the power input so that LinuxCNC has a way to power cycle the drivers, but that seems like a hassle. I'll probably just manually switch the power off and on again if that's the only way to clear the alarm. I don't expect to have to do it very frequently anyway.
Spindle motor
The spindle motor is (I think) 500 W or 750 W. This seems very low. My router has a 1500 W spindle motor, and the router is a lot less rigid than the mini mill, so I would expect the mini mill should be able to put much more power into a cut than the router can.
Another one of my weird eBay "bargains" recently was a 2200 W water-cooled spindle motor that leaks. I think it would be straightforward enough to fix the leak and fit it to the mini mill, but I'm not sure whether it would be a good idea. The 2200 W motor spins up to 24000 rpm, which is fine for a router but way too much for more traditional milling. It's possible that reducing the speed of the 2200 W motor from 24000 rpm to something more suitable would put it at a point on the torque curve where it is producing less power than the original spindle motor. So I'm not sure exactly what to do about that. For now the path of least resistance is just to wire up the motor that already fits, rather than make a mount for the other one.
When I got the machine, the spindle motor was not fitted, which confused me because everything else about the mechanical assembly seemed complete. I have now worked out why the motor was not fitted.
The mounting plate for the spindle motor is a beautifully-machined part, but it all lines up so that you can have any 2 of:
- belt installed
- motor bolted to mounting plate
- mounting plate bolted to machine
Getting all 3 at once seems impossible. I'm going to keep working at it though. There are lots of possibilities for the order of operations (motor on plate first, or plate on machine first? belt on before or after plate?), and maybe if I switch to hex head bolts instead of allen bolts I'll have more clearance to get the spanner in. Maybe this puzzle has a solution after all! Especially if I allow myself to skip out a couple of the less-important-looking bolts.
Emergency stop
The emergency stop switch provides a signal to the control software (boooo! The emergency stop should always cut power to the machine, not speak to the software). I set it up using the Stepconf tool in LinuxCNC, but found that it wasn't working at all. LinuxCNC didn't recognise that the switch was being pressed. (Which is precisely why the emergency stop needs to cut power on its own, not speak to software).
I eventually found out that the parallel port breakout board I'm using requires the 12-24V power supply to be present as well as the 5V supply if you want inputs to work.
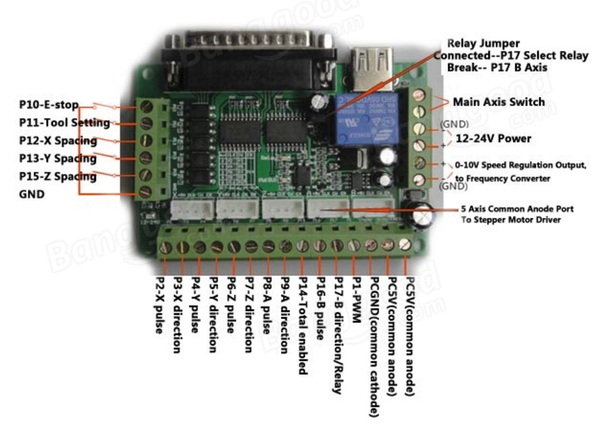
I had assumed that the 12-24V supply was only there to get 10V for the spindle speed output, but apparently not. It is even more confusing because the outputs work just fine with only the 5V supply connected. So if you're having trouble getting LinuxCNC to read inputs from the parallel port breakout board: make sure you have the 12-24V supply connected as well as the 5V one.
Limit switches
The machine doesn't have any limit switches installed. The eBay listing showed proximity sensors in one of the pictures, presumably intended for use as limit switches, but when I got everything home I found that these had not been packed in any of the boxes.
I don't think it's a big deal to be without limit switches. I don't have any limit switches on my router and that seems fine. You need to set the origin of the coordinate system before you start a job whether you have limit switches or not. In the absence of an automatic tool changer or tool height setter, I don't think there's any advantage to having the concept of a global coordinate system, so I probably won't bother fitting any limit switches.
However LinuxCNC does seem to be more of a stickler for global coordinates than Grbl is. If you try to drive the machine outside the software-configured bounding box then it causes an error instead of just doing what you asked. Probably the solution is to set the bounding box really large so that LinuxCNC always thinks it's inside it.
Enclosure
The enclosure is made out of a plastic hotel laundry basket. It seems like a really good idea. It's a lot less work than fabricating a custom metal enclosure, easier to keep watertight, and surprisingly sturdy. The door/window is a plastic panel that drops in from the top and slides inside some rails. It's a bit of a wiggle to fit the panel between my garage ceiling and the enclosure, to put it on or take it off. I don't know if this will prove to be annoying. I may put it on hinges if it is.
Coolant
Once I have the machine properly working and installed in its enclosure, I think I might like to add a flood coolant setup. I would do this with an aquarium pump. I would probably want to make sure the enclosure is slightly out-of-level so that all the liquid pools up in one corner, and then drill a hole in that corner to let the coolant drip back into the reservoir for recirculation.