
The AT28C16 EEPROM stores 2048 bytes, which means to access it all you need to control 11 address lines and 8 data lines. You also need to operate "chip enable" (pull low to enable the AT28C16), "output enable" (pull low to enable output), and "write enable" (pull low to enable writing). That means in total you need to control 22 pins, but the Arduino Uno only has 12 general-purpose digital IO pins. Problem. Fortunately, there are some tricks that make it workable.
I built my EEPROM programmer with a ZIF socket on a homemade PCB, but you can do it on a breadboard. You won't need any external components: just the Arduino Uno, EEPROM, a breadboard, and some wires.
Here's the pinout of the AT28C16:
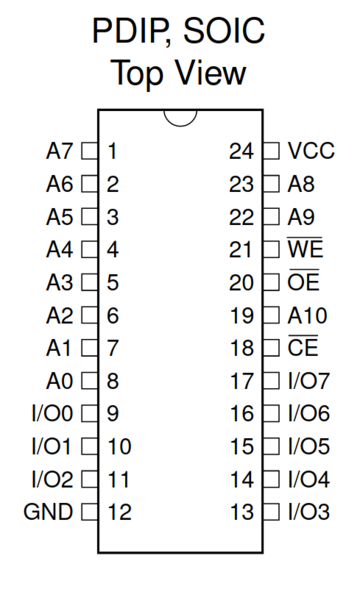
And here's a link to the datasheet.
The first AT28C16's I tried did not work, I believe they are either broken or fake. I subsequently purchased one from themicrohut and it was packaged well, arrived promptly, and worked. I recommend themicrohut and do not recommend "bigvip8018".
Permanently enable the EEPROM
If we don't actually need to control "chip enable" (say, if the only purpose of our project is to interact with the EEPROM), then we can tie "chip enable" directly to ground and save 1 pin.
Analogue pins
The Arduino Uno has 6 analogue pins, but these can also be used as digital pins.
Use the serial port for GPIO
Arduino pins 0 and 1 are used for serial communication with the PC over the USB cable. Ordinarily you have to decide whether you want to use USB serial (in which case call Serial.begin()), or you want to use pins 0 and 1 for something else (in which case don't call Serial.begin()). But we can actually almost get to have our cake and eat it by turning serial off while interacting with the EEPROM.
If you make sure that pins 0 and 1 are not connected to "output enable" or (most importantly) "write enable", then communication over the serial line will have no effect on the EEPROM. Just call Serial.end() before trying to use those pins, and then Serial.begin() again to go back to using the serial port.
You need to coordinate this with whatever is on the PC side of the serial connection. I haven't tested extensively, but it seems as if the PC side gets end-of-file on the serial device if it tries to read while the Arduino has turned serial off. It also seems that the PC side reads a nul byte immediately after the Arduino turns the serial back on. I "solved" these problems on the PC side as follows:
- after sending a command, sleep for long enough for the Arduino to handle it before trying to read the response
- strip nul bytes from responses
Control an address line by hand
So now we actually are using all of the pins that the Arduino Uno can control, and we're still 1 pin short of being able to use the AT28C16.
My solution for the last pin was to put a manual jumper on the high address bit, and have the human switch it. When the jumper is closed A10 is tied to ground (logic 0), and when the jumper is open the pull-up resistor pulls it to 5v (logic 1). When reading/writing the EEPROM, the software on the PC side acts on the first half of the address space, then asks the human to switch the high address bit, and then acts on the second half.
If you wanted it to be a bit more convenient you could use a switch instead of a jumper.
Source code
You can get the Arduino program, and the dump-eeprom and burn-eeprom programs on my SCAMP github project.
Currently it only supports reading or writing 1 byte at a time, but since I ~always want to read/write the entire EEPROM, it would probably be worth adding a way to batch up 1024 bytes at a time in between toggling the serial port on and off, just to speed things up. The Arduino only has 2048 bytes of RAM, but I'm not using half of it yet, so I am pretty sure a 1024-byte buffer would be fine. If not, even a 512 or 256 byte buffer would be an improvement over just 1 byte at a time.