Last modified: 2024-08-20 15:39:35
< 2024-08-19 2024-08-23 >Plan:
The corner holes are 15mm in from the edges. So, pick up the front left corner, check that the back right corner is at (300,200), then drill holes 15mm from each corner?
I'm going to see if I can do drilling with the high-speed spindle, starting with a 3mm drill. I expect it will work in the Minerva material but might not work so well in aluminium.
Back right seems to be at about (303, 200). Measures about 302mm with tape measure, so I'll just set it slightly in from the edge.
According to the "lathe speeds" chart, for drilling plastic with a 3mm HSS drill I want about 2100 to 9200 rpm. Let's go in the middle of the range for now, about 5500 rpm?
Drilled really easily, even feeding in Z at 370mm/min, it didn't show any sign of struggle.
Let's go up to a 6mm drill. Albeit that there is now a 3mm pilot hole so it's not a full test. This will want about half the rpm, so let's go 3000 rpm for now. Went straight through at 220 mm/min, I didn't try any faster, it made a bit of a squealing noise when I paused so I just let it keep going at the same feed rate.
And now let's go 9.5mm? Will want about 2/3 the rpm, so maybe 2000 rpm for this one? And if it stalls I'll have to go higher. It's actually not trivial to load this drill because of the constrained vertical height. With a 20mm surface on the table and a workpiece on top of that, I might not be able to do it.
It went through fine at 2000 rpm and 370 mm/min, this machine is a lot more capable than I am used to!
It did squeal quite badly once it was all the way through, I think possibly because the spindle tram is poor?
So that's the first hole drilled to 9.5mm, it is too small for the threaded insert, so I'll either re-drill it with a 10mm drill, or interpolate the bore until the insert fits, not sure yet.
I'm going to try to drill the next one with the 9.5mm drill with no pilot hole. Went all the way through at 220 mm/min, no trouble! Incredible. I'm going to write some g-code to do the rest of the holes hands-free.
Great success, worked really well: https://www.youtube.com/watch?v=O5mlCgdw7yE
So now they need boring out to fit the inserts. I think 6mm single-flute end mill, and FreeCAD Path Helix?
FreeCAD Path Helix bug:
Workaround for now is to set the tool size to 6.1mm and not set any extra offset.
Interpolating the holes has worked well as well. It took a few passes, and I eventually set the tool diameter to 5.75mm! Which should have meant it was making holes 10.5mm in diameter, I guess interpolating the holes means it ends up smaller, I'm surprised it's by this much though, maybe something to do with the G64 path blending thing? Not sure.
Anyway, I have some good holes now, and the inserts fit in them. So now I need to unbolt the table and transfer the hole locations to the aluminium surface.
Lol great, I forgot the table surface centre bolt. Will just add this by hand. Also the centre insert needs to be shorter because of the pocket where the ballnut attaches.
I'm having a bit of trouble drilling the aluminium, it is gumming up my drill bit. It was sold as 6082T6 but has "714" written on it. Is it 6082T6 or something else? And is it actually difficult to drill or am I just not very good at it?
714 doesn't seem to be a name for a grade of aluminium. Maybe I just need to put some WD40 on it, I was drilling it dry. It seems like it gets hard near the surface.
Might just be that my 3mm drill is not very effective, or not spinning fast enough. The 6mm drill (with 3mm pilot hole) goes through much more easily.
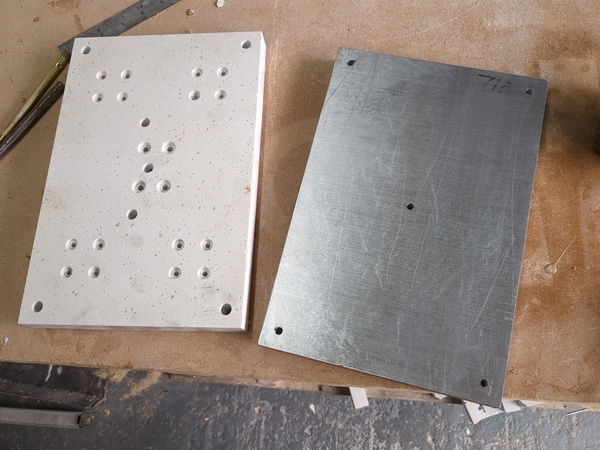
All of today's holes drilled:
The holes in the aluminium surface are only 6mm now, can be widened later if necessary.
Now I need to make the short insert, and then epoxy the inserts into the table. The short insert wants to be 14mm long.
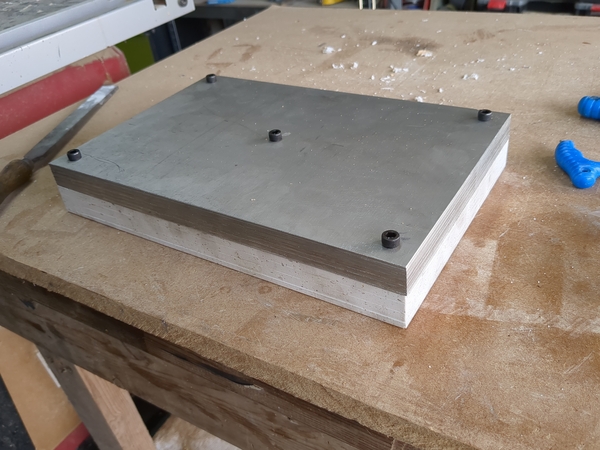
Inserts gluing in now, need to take the bolts out at about 4pm so they don't get glued in place.
I took the bolts out, cleaned up the excess epoxy, and bolted the surface on just to see if it fits:
Quite accurate drilling! I drilled the holes in the aluminium by hand, to only 6mm, and they all line up! Good.
The radius/diameter bug sounds easy to fix, so I'm going to try.
Classic, it's already been fixed... https://github.com/FreeCAD/FreeCAD/issues/10157
The ground floor is done except for sloping ceilings. I just need to do the one on the conservatory and the one on the kitchen, then I can look at making maybe the staircase, then move upstairs.
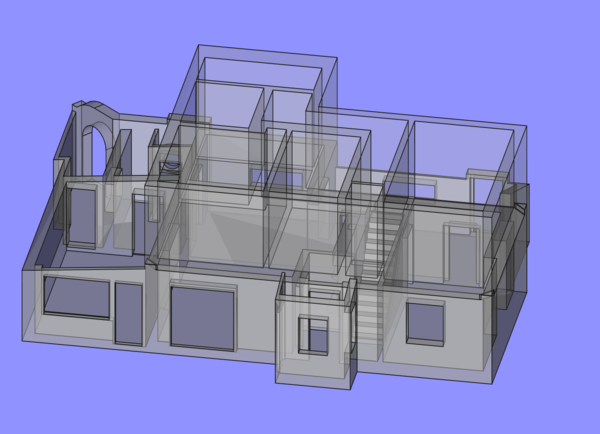
This has all the sloping roofs, the proper shape for the stone wall, some features in the corners to locate the first floor, a staircase, and a rough start on the first floor.
The staircase is a removable piece, so that I can enjoy taking it out and seeing the cupboard under the stairs turn into a corridor connecting it to the hallway.
< 2024-08-19 2024-08-23 >